

We know that the old operating system only allows you to take screenshots, so you can easily record your screen movements without the need for any additional applications. Read on to find out how to screen record on iPhone.
Enable iOS screen recording
- You must enable the recording function before you start screen recording your iPhone.
- First, go to your device’s Settings.
- Then go to the Control Center and scroll down until you see Screen Saving.
Control Center
- Then click the green ‘‘+’’ button next to Screen Recording to add it to the Control Center.
Screen Recording
- Start screen recording
- After activating the screen recorder, you can now take a snapshot of your screen.
- Open your Control Center by swiping your iPhone screen from the bottom up.
- Find and click the save icon.
- Start screen recording
Recording microphone sound
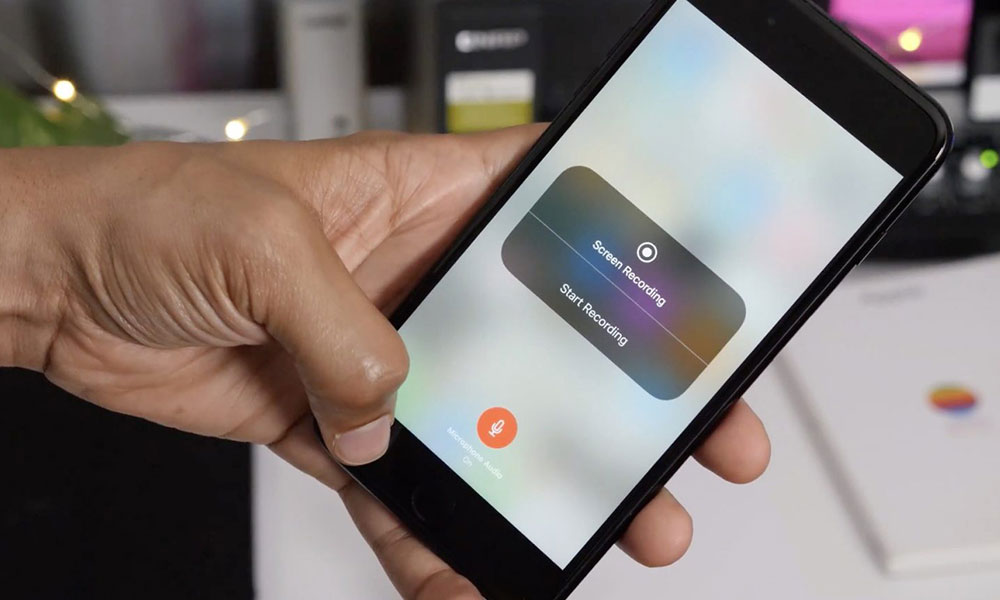
- If you want to record the sound from your microphone, touch and hold the Recording icon.
- You will see a new window coming up. On your device, click the Microphone icon to activate the microphone and finally select the Start Recording button to record screenshots.
Recording microphone sound
- Stop screen recording
- Your phone has two ways to stop recording.
- The first is to touch the status bar at the top of the screen. In the window that will open, tap Stop.
Stop screen recording
Another way is to open the Control Center and touch and hold the Registration icon. Then touch the Stop Recording button.
Editing recorded video
- To edit your file, go to the Photos application on your device, and then select the video.
- Click the Edit button at the bottom of the screen.
- To cut files, touch and hold the anchor icons on both sides, then move them left or right.
- The highlighted section shows the portion that remains after cropping the file.
- When finished, click ‘‘done’’.
Tips for How to Screen Record on iPhone
Due to restrictions on iOS devices, the question of how to screen record on iPhone comes to mind and it is very difficult to find a fully working display program. They are all involved in unsuccessful applications in one aspect. That’s why you need to pay attention.
Of course, you should use an application with high resolution. You should also choose an application that supports different video formats and can record from different audio sources for proper operation. In addition, you should use a program that can record your device’s movements properly in portrait or landscape when rotating the screen.
Another important thing to consider about how to screen record iPhone is the performance of your phone and how much storage you need to pay attention to.
How To Screen Record On iPhone
Have you ever seen a video on Instagram that you liked too much and wanted to record it? Or is your phone showing some malfunctions and you want to record exactly what is happening in your phone. Or maybe you just want to guide someone how to use an app and want to record the on screen process. If any of these situations ring true then you should definitely learn how to screen record on iPhone. Using the screen record function, you can record anything happening on your iPhone screen. This can be very useful in numerous situations. Here’s how to screen record on iPhone.

First of all, before beginning to screen record on your iPhone, you need to enable it by adding it to your phone’s Control Center. After that is done, you need to figure out which button begins the screen record as the procedure for starting the screen recording depends upon the version of iOS that you are using.
Turn on the ability to record your screen
Touch the Settings icon to access the settings and then go to “Control Center.” From there select “Customize Controls.”
From there locate “Screen Recording”. If it isn’t present in the section labeled as Include, then touch the green plus sign next to it. This will move the screen recording option to the “Include” section.
After you are done with recording your iPhone’s screen, you can let the Screen Recording be in the Control Center or you can return back here and tap on the red minus sign to remove it.
How To Screen Record On iPhone | Record your screen
Go to the app or the screen which you want to record from.
Swipe upwards from the bottom portion of the screen and pull up the Control Center. If you are using an iPhone X or later, or using an iPad with iOS version 12 or later, you’ll need to swipe down from the top right corner of the screen and pull down the Control Center.
Tap on the Record button to begin recording.
A three second countdown will begin after which the Record button will become red and everything you do on the screen will begin to be recorded. This will continue even if you close the Control Center. You’ll get to know about the recording status by the time indicator on the upper left corner of the screen that will be in red.
Once you are done with the recording and want to stop recording, then tap the red time indicator at the upper left part of the screen and then tap “Stop” to stop recording.
If you wish to narrate the audio for your recording, then long press on the red record button. The Screen Recording options will open up from where you can change or add any audio source. Tap on the Microphone icon to change it from microphone off to microphone on and then tap on the record button to start recording.
These were the simple steps which you need to follow if you want to know how to screen record on iPhone. In this article we have explained how to screen record on iPhone.